![Hopper Prod[421].png](https://static.wixstatic.com/media/e83617_8c169df6a4b041ce8eeb66e063588d91~mv2.png/v1/fill/w_235,h_169,al_c,q_85,usm_0.66_1.00_0.01,enc_avif,quality_auto/Hopper%20Prod%5B421%5D.png)
Studio 1 Senior Project
This page highlights my very first senior project at SCAD, completed in the Studio 1 class. I had the privilege of collaborating closely with a friend on this challenging and rewarding journey. Together, we shared responsibilities across every aspect of the project — from modeling, texturing, and lighting to destruction animations and sound effects. The project took about three months to complete and was an incredible opportunity to dive deep into simulation and special effects, especially using Houdini for the first time on a major project. We chose to recreate the main lobby of a gym where my friend works, bringing the space to life with realistic physics-driven effects and particle simulations. As the producer, I coordinated everything from securing resources at our school’s film cage to organizing our shoot and making sure we met every class deadline. It was a great learning experience in project management as well as creative collaboration. Throughout the process, we combined careful research on FX physics with hands-on work in modeling, texturing, and animation, pushing ourselves to create a dynamic, immersive final project.
Week 1
Laying the Foundation for MagicThis week, our adventure began with carefully measuring every detail to bring our world to life. Like skilled artisans, we crafted each model in Maya, shaping the pieces that would soon fill our scene. Once the models were ready, we placed them thoughtfully into the room — the stage for our story. Finally, we prepared to bring everything into Houdini, where the real magic of effects and animation would begin.
Week 2: Setting the Scene
This week was all about capturing details and preparing for the exciting moments ahead. In the photo to the right, you can see Kaden measuring the distance from the bar to the camera — a key step in making sure our digital space matched the real-world environment.We also took measurements of the bar and other objects in the room to ensure accurate modeling and placement later in Maya. These details helped us create a believable space filled with character and story.In the other photo, I (Dylan) am seen recording our actor — Kaden — as he reacts to the destruction caused by the wrecking ball. This footage helped us study timing, emotion, and physical response, while also capturing a clean plate of the scene for FX and compositing.Over the weekend, we filmed additional reference clips and clean templates to support our project’s visual storytelling and realism.We’ve also completed our first previs (pre-visualization) — an exciting milestone that gives a glimpse of the action and destruction to come!
Here’s the footage we captured — it helped us study timing, emotion, and physical response, while also providing a clean template of the environment. This clean plate is essential for FX and compositing, allowing us to seamlessly add destruction effects without visual interference.
With everything on track this week, we decided to leap ahead and explore the world of animation — a new adventure for both of us. While we're not animation majors, we were eager to dive in and get a feel for the storytelling power behind movement. It was a truly eye-opening experience. Playing with keyframes and mixing them with physics felt like learning a new kind of magic. We had no idea just how much science and precision went into making something feel believable — from the weight of an object to the way it reacts to the world around it.The video above is our very first playblast test of the wrecking ball physics. While the layout is simple and still in the blocking phase, it was a huge moment for us — watching our scene begin to move, collide, and respond. It may just be a test, but it was our first glimpse at the spell starting to work.
During the same week, we discovered a little extra time to add more spark to our scene by modeling additional props — starting with the humble towels!Here’s a turntable render from Maya that lets you see the towels from every angle, as if they’re twirling on stage. Though simple, these small details help breathe life and warmth into our world — because in every great story, it’s the little touches that ignite the spark and make the scene truly come alive.
While I was modeling the towels, Kaden was hard at work modeling and texturing the wrecking ball. We didn’t just rely on Maya and Houdini — we also used other tools like Adobe Substance 3D Painter to bring the wrecking ball’s surface to life with realistic textures.Below, you’ll find a previs and early test of the wrecking ball smashing through the wall — a thrilling glimpse of the action and destruction that’s coming to life in our project.
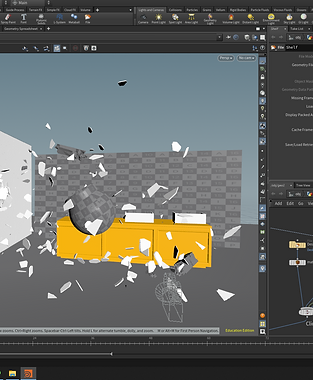
Once we finished modeling some extra props, we dove into Houdini to experiment with the physics of the wrecking ball and the wall’s destruction. We tested the speed and gravity of the wrecking ball’s swing, choreographing the dramatic impact that sends debris flying. We also refined the size and behavior of the debris, shaping the chaos to create a powerful and believable scene.
Corner View Front View
With Week 2 behind us, we accomplished a lot — immersing ourselves in the art of physics and animation within Maya and Houdini. It was a journey of creative exploration and learning, filled with inspiring breakthroughs and challenges that pushed us to grow. Each step brought us closer to transforming our vision into a living, breathing scene.
Week 3: Bringing It All Together
This week, once the scene and camera were perfectly aligned, we focused on enhancing the FX in Houdini. We began crafting the dramatic wrecking scene, carefully animating the wrecking ball with its chains to bring authentic motion and weight to the destruction.Looking ahead, Kaden and I will be creating a progress video complete with breakdowns and a demo reel to showcase the journey and highlights of our project, Wrecking.
Here’s the breakdown of our test for the wall destruction. Once we perfect the wall’s behavior and effects, we’ll bring in the detailed model that Kaden created in Maya to complete the scene — making the destruction even more realistic and impactful.
Unfortunately, our initial template shoot didn’t go as planned, and the footage wasn’t usable. But setbacks are part of the creative journey, and we’re ready to tackle this challenge. We’ve scheduled a reshoot at the gym over the weekend and are optimistic that this time we’ll capture the clean template we need to keep our project on track.
Week 4: Aligning Vision and Motion
This week, we finally got the camera tracking to work perfectly. With the camera now seamlessly aligned with the scene, we’re ready to import the Maya models into Houdini and dive deeper into adding FX to bring our project to life.
Below are images showcasing our tests of the physics and debris — capturing the dynamic energy and detail that bring our scene to life.
Here’s our first attempt at creating dust and debris. I began by placing basic shapes like boxes, spheres, and lines, then transformed and resized them before adding a debris source to simulate realistic destruction. It’s still a work in progress, but each step brings us closer to capturing the dynamic chaos that makes the scene truly come alive.

Here’s the latest on the wood studs — we’re continuing to refine their look to make them as realistic as possible. It’s a work in progress, but with every adjustment, the details come closer to capturing the authentic texture and feel that will bring the scene to life.
Here’s a preview of the wrecking scene featuring the wood studs — an exciting step as the destruction begins to take shape with more detail and realism.

Week 5: Midterm Week — The Moment of Truth!
This week marked an exciting milestone as we submitted a short breakdown of our wrecking ball scene for midterms. It’s been a whirlwind of creativity and hard work, and sharing our progress feels like the first big step toward bringing our vision fully to life!
During this week, things felt a little rough — and honestly, a bit scary. Midterms were here, and the pressure was on. The presentation was scheduled, and we were definitely nervous about showing our progress and speaking in front of everyone. What made it even more intense (and exciting) was that the presentations were held on stage at one of the school’s theaters.Despite the nerves, it was absolutely incredible seeing our project play on the big movie screen for the very first time. After everyone presented their work, we all felt a sense of pride — and we received some fantastic feedback from our classmates.Funny enough, we may have accidentally scared half the theater with the intensity of the sound effects in our breakdown. That wasn’t our intention — but it definitely left a lasting impression!
"Here's a quick test showcasing all of the components coming together — a first glimpse at the full scene coming to life!"

"Here’s a test featuring the ground collision — an important step in refining the realism of our destruction sequence."

Here’s the full sequence in action — combining the wall and ground destruction along with the wood studs for a more dynamic and detailed simulation."
Week 6 – Breaking Ground and Building Momentum
Our goal this week is to finalize the ground collision and debris simulations, wrapping up the major destruction elements of the scene. With the wreckage falling into place, we’re aiming to move into texturing by Class 15 — bringing even more life and detail to our project!
Over the weekend, we continued refining the debris simulation for the wall destruction scene.
Here’s a sneak peek at our latest magical journey with the wall debris! We’re still exploring and perfecting the effects, using shelf debris as our special ingredient to bring the crumbling wall to life. With a little bit of creativity and a sprinkle of pixie dust, we’re working to make it even more realistic and enchanting. Stay tuned

For this test, I gently moved the desk and cubby out of the way to help our software run smoother and faster

After many magical hours exploring Houdini and diving deep into the secrets of the debris source tool, I’m beginning to understand its magic a bit better than before! The Adventure So Far…
Along the way, we ran into a few tricky challenges. The first was getting to know the tool itself—figuring out all the settings and how to make the debris source tool and its friends work together. It was quite the puzzle! But here’s the surprise — Houdini didn’t crash once! Talk about a lucky charm! Another challenge was that the little debris particles seemed to have a mind of their own, drifting right through the floor like mischievous spirits. Plus, with over 10,000 particles swirling around, it was like trying to tame a wild whirlwind! It’s still a work in progress, but with a sprinkle of patience and a dash of creativity, the magic will surely come together.
Here’s another update — one of the best versions of the debris so far!

After reviewing my settings in Houdini for the debris, I decided to reduce the number of particles from 10,000 to 5,000 in the scene.
Problems
I ran into fewer issues than at the start of the weekend, though there are still some minor glitches with the debris and its settings. Overall, I’m happy with the progress so far.
Next, I’ll try to capture a better video of the debris in action. The next step will be adding debris on the ground.
.

Class 15

The two pictures below show the UV maps for the Wall and the Studs, created in Houdini using the Unwrap UVs tool.
WEEK 6
Week 6, was a bit challenging for Kaden and me. I was responsible for exporting the Wall, Studs, Wrecking Ball, Ground Collision, and Debris, while Kaden handled rendering the files in Maya Arnold.
Problems
We ran into issues exporting these elements as .ABC files. I realized I had missed some important steps early on—I forgot to add the unwrap UVs and a delete node to remove the inside and outside faces for the Wall and Studs.
Another big challenge was sharing the files with Kaden. We tried emailing them, but the files were too large. Then we attempted Google Drive, but again, size was a problem. MyFile didn’t work either, so I ended up uploading the files to my personal drive and brought them over to Monty to drop them onto the shared drive.
Kaden also faced some problems importing the files into Maya for rendering—some files wouldn’t load properly. After hours of re-exporting and troubleshooting, we discovered that some files were assigned to Render Layers, which caused the Ground floor not to show up.
Problem Solved
Now, everything is under control. Kaden got the files working in Maya and is ready to start texturing and rendering. There may still be some minor issues, but we’re confident they can be resolved quickly.
Weeks 7-8: Bringing FX to Life, One Frame at a Time!
During weeks 7 and 8, we started exporting the FX from Houdini to Maya for texturing, followed by rendering on the render farm. Once the project finishes rendering, Kaden knows someone who can help with sound.I’ll be posting updates and progress as we move forward. For now, the file is rendering, and we’re waiting for the scene to complete.
Here's the Early Render Test
Week 9: The Magic of HD540 Rendering!
This week, we finally got the project rendering at a crisp HD540 resolution—woohoo! But, of course, every adventure has its challenges. We ran into a little hiccup with the render settings: the studs layer needed the desk and shelf objects so those pieces would stay hidden behind them.The wall needs a color change because it isn’t meshing well with the original plate. Also, there are a very limited number of AOVs present, and I’m not sure why just yet.By Wednesday, we should have everything fully rendered, and sometime between Wednesday and Friday, we’re expecting sound and a breakdown to come together.No worries though! With a sprinkle of creativity and teamwork, we’re ready to make it all shine perfectly. Onward to more magic!